
mailcow安装
前置准备
推荐配置:
VPS配置要求蛮高的,因为有很多容器。关闭一些容器能节省一些性能。
ClamAV 和 Flatcurve(FTS 引擎)可能会占用大量内存。您可以通过在 mailcow.conf 文件中设置 SKIP_CLAMD=y 和 SKIP_FTS=y 来禁用它们。
Mailcow 是一个功能齐全、即用型的群件,包含许多便捷的附加功能。Mailcow 自带 Web 服务器、Web 邮件程序、ActiveSync(微软)、防病毒软件、反垃圾邮件软件、索引器、文档扫描器(Oletools)、SQL(MariaDB)、缓存(Redis)、邮件分发代理(MDA)、MTA 以及各种 Web 服务等。
然后放行如下端口25|80|110|143|443|465|587|993|995|4190 其中80、443可以听过配置改为其他的,使用反代。
对应的协议、端口、容器表:
DNS信息配置
在安装前我们先配置DNS, 因为这可能要过一会生效
官网文档也给出了参考配置
${MAILCOW_HOSTNAME}是你的邮件服务器域名, 例如mail.example.org, 最少需要配置4个DNS记录
# Name              Type       Value
mail                IN A       1.2.3.4
autodiscover        IN CNAME   mail.example.org. (your ${MAILCOW_HOSTNAME})
autoconfig          IN CNAME   mail.example.org. (your ${MAILCOW_HOSTNAME})
@                   IN MX 10   mail.example.org. (your ${MAILCOW_HOSTNAME})
DKIM, SPF 和 DMARC配置
在下面的示例 DNS 区域文件片段中,使用了一个简单的 SPF TXT 记录,仅允许此服务器(MX 服务器)为您的域发送邮件。其他所有服务器均被禁止但可以发送邮件(“~all”)。请参阅 SPF 项目以获取更多信息。
# Name              Type       Value
@                   IN TXT     "v=spf1 mx a -all"
保护自己和他人的最后一步是实施 DMARC TXT 记录,例如使用 DMARC 助手(检查)。
# Name              Type       Value
_dmarc              IN TXT     "v=DMARC1; p=reject; rua=mailto:mailauth-reports@example.org"
DKIM TXT 记录等后续跑起服务来再回来配置。
安装
克隆版本库
su
umask 0022
cd /opt
git clone https://github.com/mailcow/mailcow-dockerized
cd mailcow-dockerized
通过仓库里的脚本生成配置文件
./generate_config.sh之后在当前目录下,会生成一份配置文件mailcow.conf ;如果想修改配置,可以全部复制给AI,让AI给你总结一下,然后你再确认修改哪些东西。
这里就修改mailcow的nginx容器端口,后续反代需要。
HTTP_PORT=80
HTTP_BIND=

HTTPS_PORT=443
HTTPS_BIND=

#改为下面的

HTTP_PORT=8080
HTTP_BIND=127.0.0.1

HTTPS_PORT=8443
HTTPS_BIND=127.0.0.1
同时添加,以让mailcow的nginx信任前置
TRUSTED_PROXIES=127.0.0.1,172.22.1.1 因为使用了反代,同时需要在mailcow.conf 里修改下面代码,关闭301跳转ssl。
HTTP_REDIRECT=n前置的Nginx配置也要改,主要是改使其支持邮件客户端配置协议
server {
  listen 80 default_server;
  listen [::]:80 default_server;
  server_name CHANGE_TO_MAILCOW_HOSTNAME autodiscover.* autoconfig.*;
  return 301 https://$host$request_uri;
}
server {
  listen 443 ssl http2;
  listen [::]:443 ssl http2;
  server_name CHANGE_TO_MAILCOW_HOSTNAME autodiscover.* autoconfig.*;

  ssl_certificate MAILCOW_PATH/data/assets/ssl/cert.pem;
  ssl_certificate_key MAILCOW_PATH/data/assets/ssl/key.pem;
  ssl_session_timeout 1d;
  ssl_session_cache shared:SSL:50m;
  ssl_session_tickets off;

  # See https://ssl-config.mozilla.org/#server=nginx for the latest ssl settings recommendations
  # An example config is given below
  ssl_protocols TLSv1.2;
  ssl_ciphers HIGH:!aNULL:!MD5:!SHA1:!kRSA;
  ssl_prefer_server_ciphers off;

  location /Microsoft-Server-ActiveSync {
    proxy_pass http://127.0.0.1:8080/Microsoft-Server-ActiveSync;
    proxy_set_header Host $http_host;
    proxy_set_header X-Real-IP $remote_addr;
    proxy_set_header X-Forwarded-For $proxy_add_x_forwarded_for;
    proxy_set_header X-Forwarded-Proto $scheme;
    proxy_connect_timeout 75;
    proxy_send_timeout 3650;
    proxy_read_timeout 3650;
    proxy_buffers 64 512k; # Needed since the 2022-04 Update for SOGo
    client_body_buffer_size 512k;
    client_max_body_size 0;
  }

  location / {
    proxy_pass http://127.0.0.1:8080/;
    proxy_set_header Host $http_host;
    proxy_set_header X-Real-IP $remote_addr;
    proxy_set_header X-Forwarded-For $proxy_add_x_forwarded_for;
    proxy_set_header X-Forwarded-Proto $scheme;
    client_max_body_size 0;
  # The following Proxy Buffers has to be set if you want to use SOGo after the 2022-04 (April 2022) Update
  # Otherwise a Login will fail like this: https://github.com/mailcow/mailcow-dockerized/issues/4537
    proxy_buffer_size 128k;
    proxy_buffers 64 512k;
    proxy_busy_buffers_size 512k;
  }
}执行docker compose up -d
登录后续配置
进入admin路径,如mail.xxx.xx/admin1 ,使用默认账户密码:admin moohoo 登录。以进行后续配置。
登录后记得修改管理员密码和其他安全认证。
DKIM创建
在此之前,需要把域名添加进去
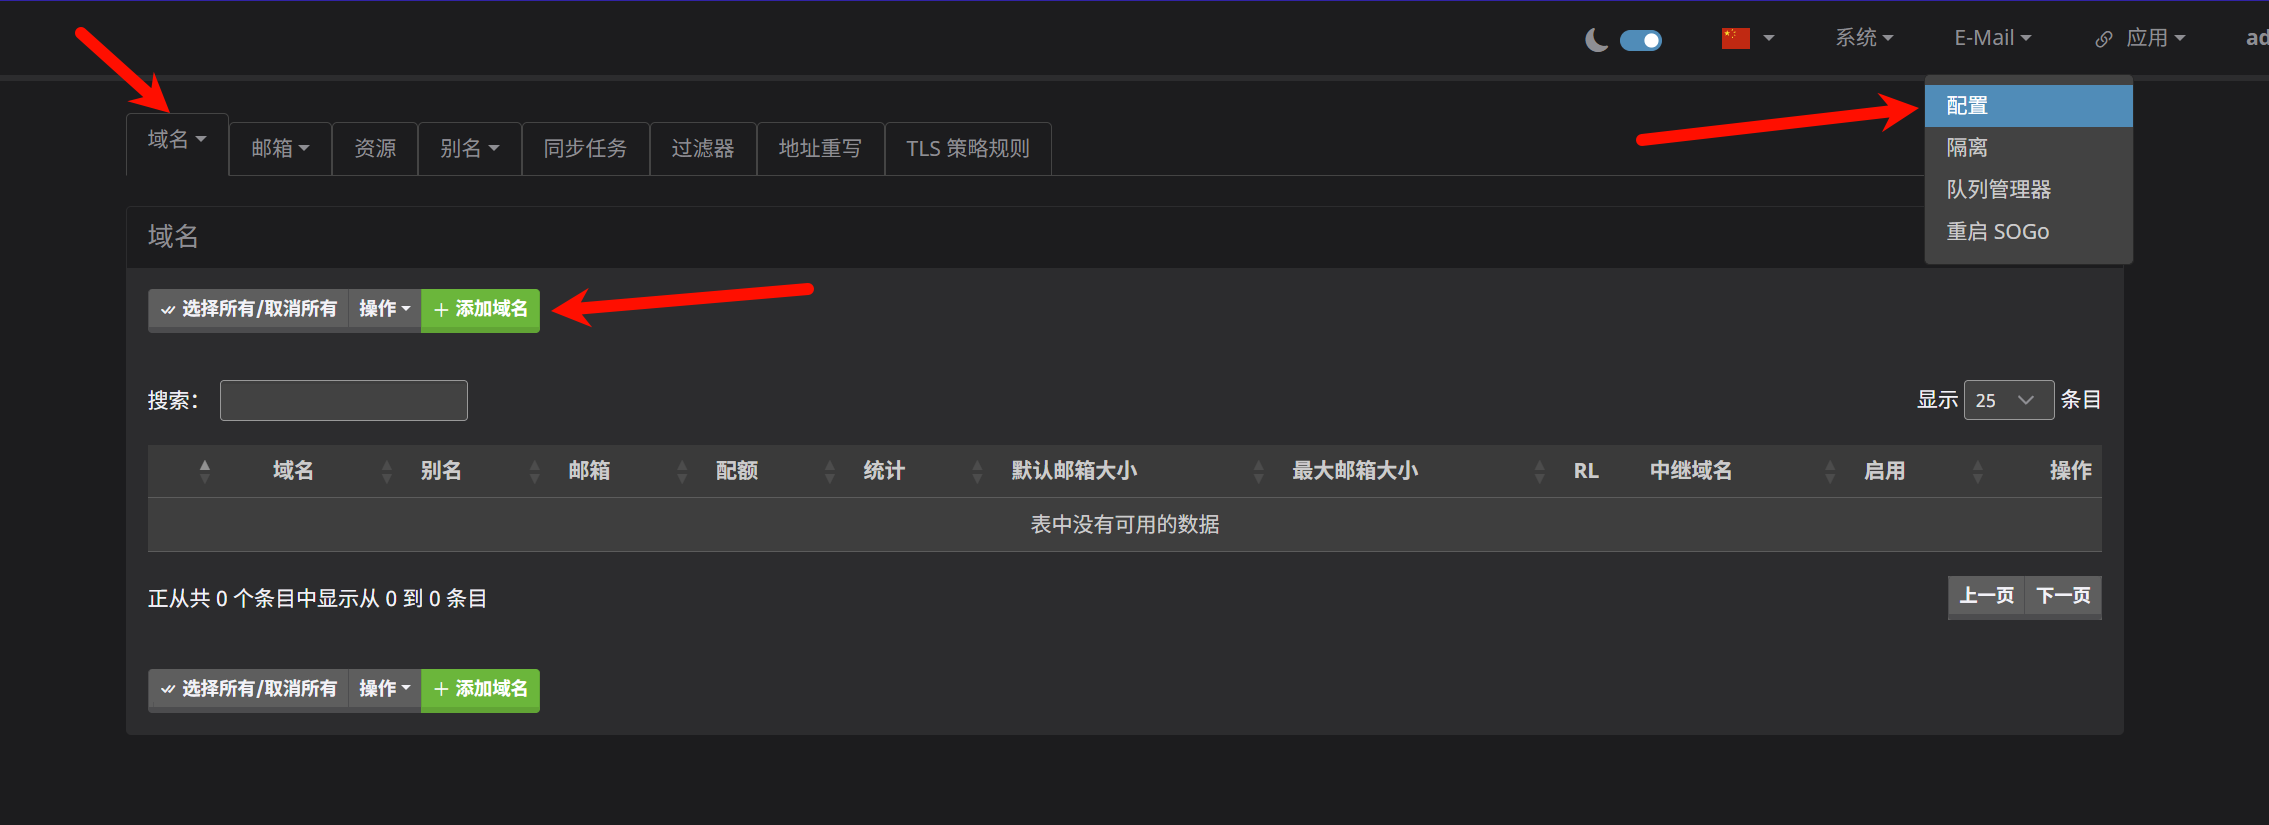
点击"添加域名",然后把二级域名写入,再点击添加并重启即可。
此时再进入ARC/DKIM 密钥 页面即可复制使用
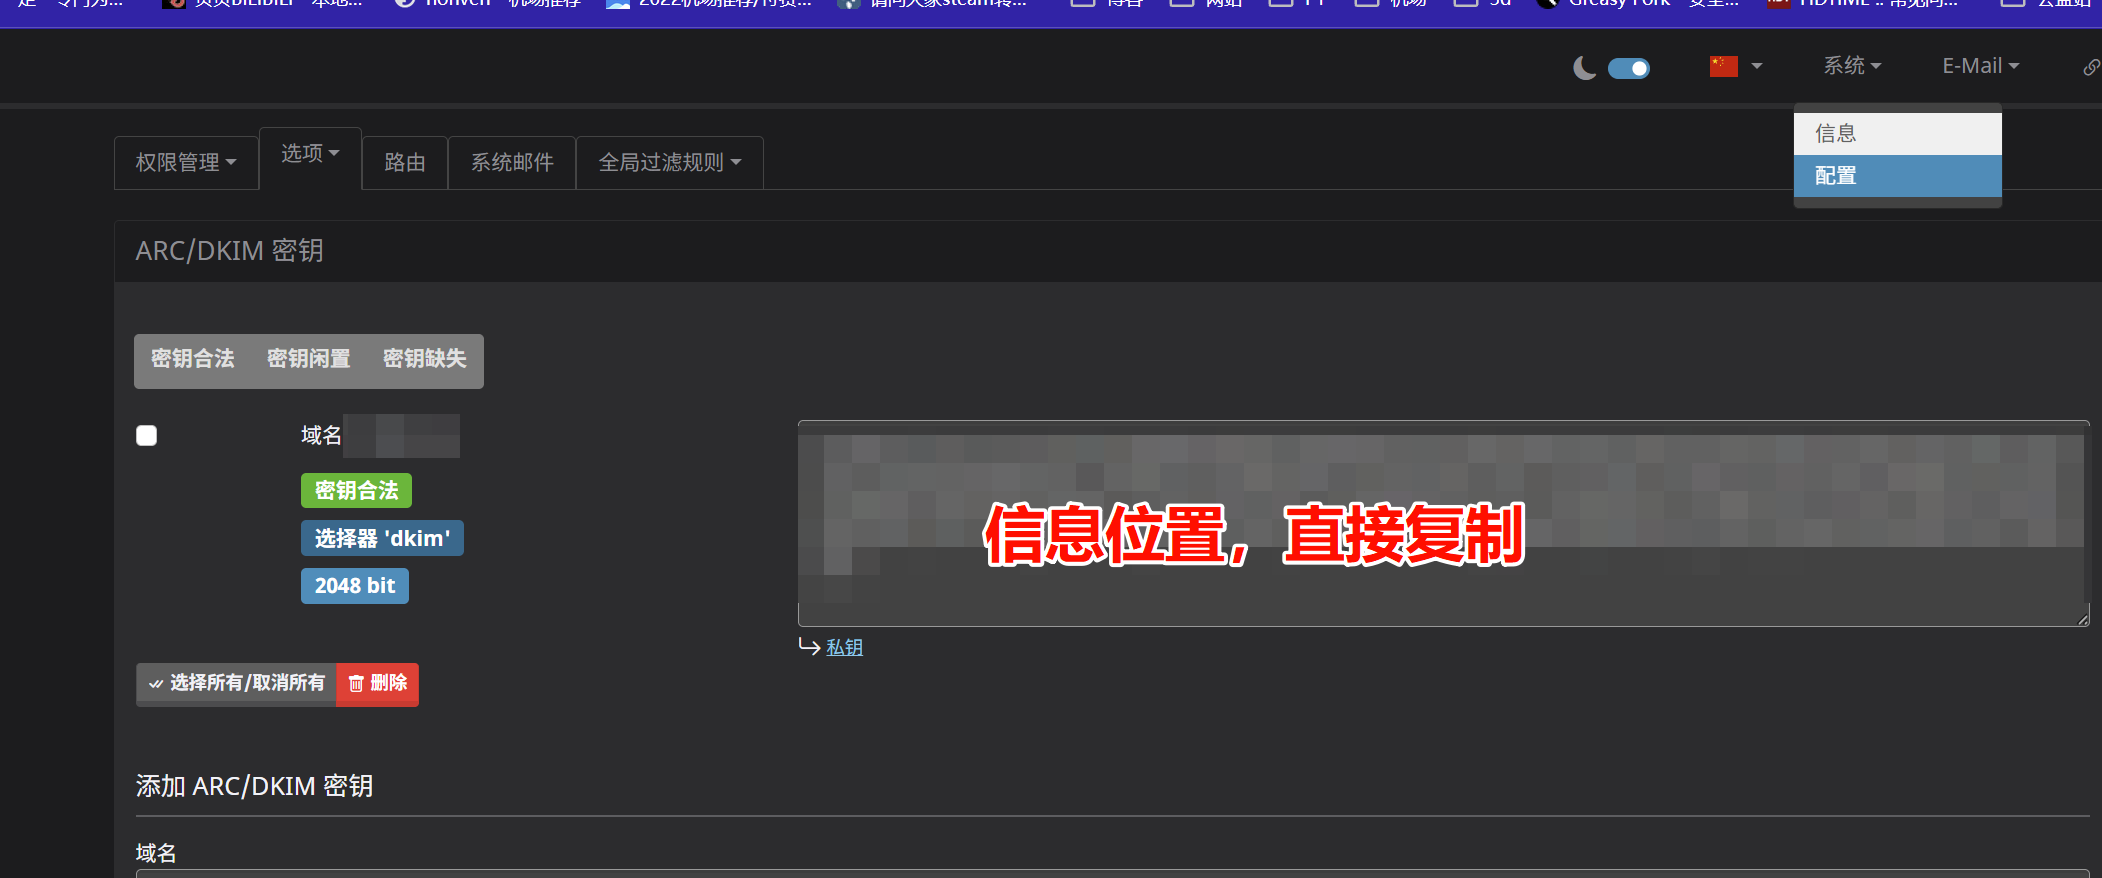
# Name              Type       Value
dkim._domainkey     IN TXT     "v=DKIM1; k=rsa; t=s; s=email; p=..."
评论